We recommend using the Mozilla SSL Configuration Generator. The following is a simple tutorial if you want to configure Apache yourself.
On the Apache HTTP server, make sure mod_ssl is installed into the server and enabled. You will need the CA certificate (referred to as cacert.pem), the private key you wish to install in unencrypted form (key.dec.pem), and the signed certificate (cert.pem). Once you have uploaded these files to a suitable location on your webserver, edit the virtualhost configuration in your httpd.conf file. Make a copy of the VirtualHost for use with TLS encryption:
<VirtualHost *:443>
...
SSLEngine on
SSLCertificateFile /path/to/cert.pem
SSLCertificateKeyFile /path/to/key.dec.pem
SSLCACertificateFile /path/to/cacert.pem
SSLProtocol all -SSLv2

#Keep the following as one line, ending with !PSK
SSLCipherSuite ECDHE-RSA-AES128-GCM-SHA256:ECDHE-ECDSA-AES128-GCM-SHA256:ECDHE-RSA-AES256-GCM-SHA384:ECDHE-ECDSA-AES256-GCM-SHA384:DHE-RSA-AES128-GCM-SHA256:DHE-DSS-AES128-GCM-SHA256:kEDH+AESGCM:ECDHE-RSA-AES128-SHA256:ECDHE-ECDSA-AES128-SHA256:ECDHE-RSA-AES128-SHA:ECDHE-ECDSA-AES128-SHA:ECDHE-RSA-AES256-SHA384:ECDHE-ECDSA-AES256-SHA384:ECDHE-RSA-AES256-SHA:ECDHE-ECDSA-AES256-SHA:DHE-RSA-AES128-SHA256:DHE-RSA-AES128-SHA:DHE-DSS-AES128-SHA256:DHE-RSA-AES256-SHA256:DHE-DSS-AES256-SHA:DHE-RSA-AES256-SHA:AES128-GCM-SHA256:AES256-GCM-SHA384:AES128:AES256:AES:DES-CBC3-SHA:HIGH:!aNULL:!eNULL:!EXPORT:!DES:!RC4:!MD5:!PSK

SSLHonorCipherOrder on
SSLCompression off
...
</VirtualHost>
Warning: do not enable HSTS with TinyCert certificates, as they are considered "self-signed" and your browser may deny access to the underlying website.
If you wish to ignore the warning and enable HSTS, to force use of HTTPS on your site, add another directive:
Header add Strict-Transport-Security "max-age=15768000"We recommend using the Mozilla SSL Configuration Generator. The following is a simple tutorial if you want to configure nginx yourself.
With the nginx HTTP server, make sure it was configured and compiled with the --with-http_ssl_module option. Download from TinyCert, the private key you wish to install in unencrypted form (key.dec.pem), and the certificate chain that includes your own certificate as well as the CA certificate (certchain.pem). Once you have uploaded these files to a suitable location on your webserver, edit the virtualhost configuration in your nginx.conf file. Find the server{} section for which you want to use TLS encryption:
server {
	#Remove the following line if you do NOT want the server to respond to regular HTTP requests
	listen 80;
	listen 443 ssl;

	ssl_certificate /path/to/certchain.pem;
	ssl_certificate_key /path/to/key.dec.pem;
	...
}
Other settings which can be placed in the server{} section but are more appropriately put in the http{} section are:
http {
	...
	#Keep the following as one line, ending with !PSK';
	ssl_ciphers 'SSLCipherSuite ECDHE-RSA-AES128-GCM-SHA256:ECDHE-ECDSA-AES128-GCM-SHA256:ECDHE-RSA-AES256-GCM-SHA384:ECDHE-ECDSA-AES256-GCM-SHA384:DHE-RSA-AES128-GCM-SHA256:DHE-DSS-AES128-GCM-SHA256:kEDH+AESGCM:ECDHE-RSA-AES128-SHA256:ECDHE-ECDSA-AES128-SHA256:ECDHE-RSA-AES128-SHA:ECDHE-ECDSA-AES128-SHA:ECDHE-RSA-AES256-SHA384:ECDHE-ECDSA-AES256-SHA384:ECDHE-RSA-AES256-SHA:ECDHE-ECDSA-AES256-SHA:DHE-RSA-AES128-SHA256:DHE-RSA-AES128-SHA:DHE-DSS-AES128-SHA256:DHE-RSA-AES256-SHA256:DHE-DSS-AES256-SHA:DHE-RSA-AES256-SHA:AES128-GCM-SHA256:AES256-GCM-SHA384:AES128:AES256:AES:DES-CBC3-SHA:HIGH:!aNULL:!eNULL:!EXPORT:!DES:!RC4:!MD5:!PSK';
	ssl_prefer_server_ciphers on;
	ssl_protocols SSLv3 TLSv1 TLSv1.1 TLSv1.2;
	ssl_session_cache shared:SSL:10m;
	ssl_session_timeout 10m;
	...
}
Warning: do not enable HSTS with TinyCert certificates, as they are considered "self-signed" and your browser may deny access to the underlying website.
If you wish to ignore the warning and enable HSTS, to force use of HTTPS on your site, add another directive:
add_header Strict-Transport-Security max-age=15768000;Microsoft Windows Server comes with Microsoft's IIS and it supports SSL certificates out of the box. However, they must be imported through a PKCS#12 archive file. Download the archive file from TinyCert (cert.pfx). This contains both the certificate and the private key. The archive as a whole is also protected by your passphrase.
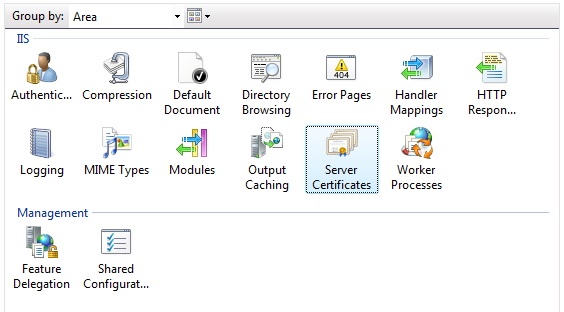
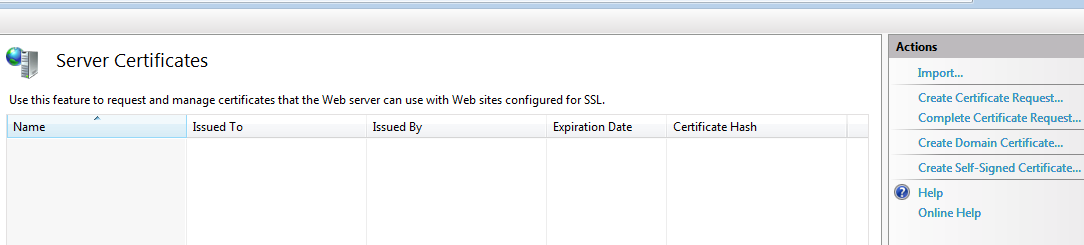
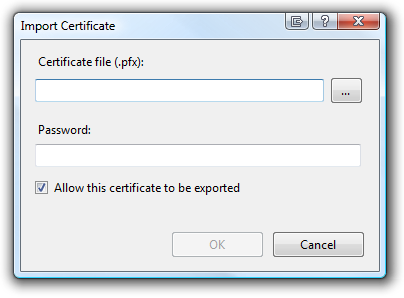
To install the certificate, go to the Control Panel, and open "Administrative Tools", then "Internet Information Services (IIS) Manager". In the "Connections" pane on the left, select the appropriate server to see the available applets for it, and double-click the Server Certificates applet. Select the "Import..." action on the right to open the "Import Certificate" window. Use the browse button (labelled "...") to locate and select the cert.pfx file and enter your passphrase in the password field. Once you click OK, the certificate will be imported.
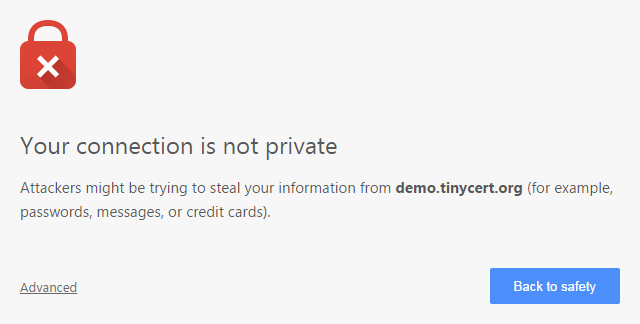
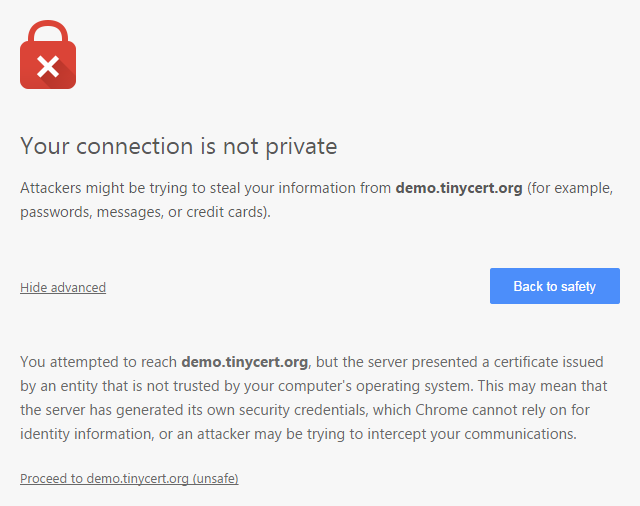
When visiting a site secured with a TinyCert or self-signed certificate, Chrome will display a warning message. Clicking the "Advanced" link will display further information that includes a link to "Proceed to your site (unsafe)". You will need to go through this procedure every time you visit the site in question, unless you add your TinyCert CA certificate to the operating system certificate store as described below.
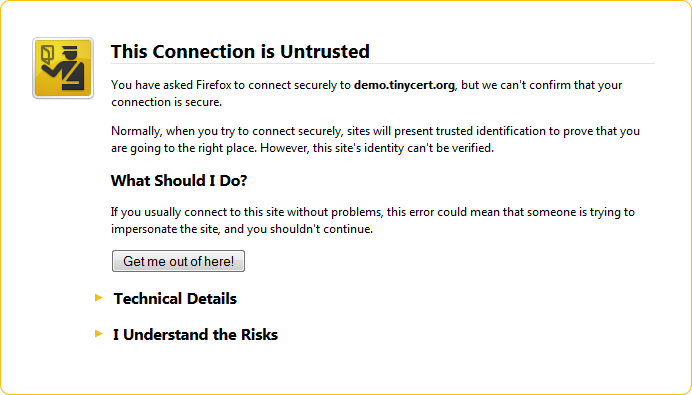
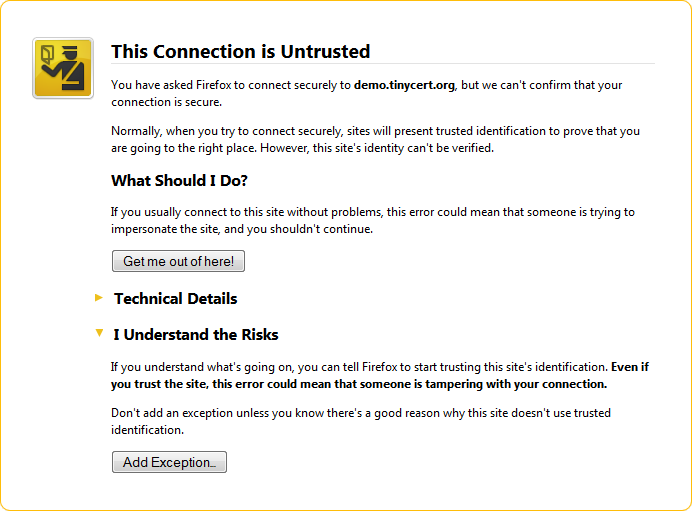
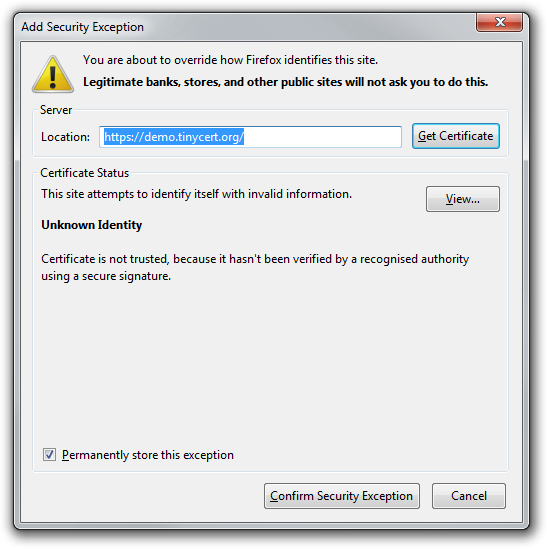
When visiting a site secured with a TinyCert or self-signed certificate, Firefox will display a warning message. Clicking the "I Understand the Risks" link will display further information that includes the "Add Exception..." button. Once you click that, a window pops up. You should keep the "Permanently store this exception" checkbox enabled and then click "Confirm Security Exception". Firefox won't bug you about this certificate again.
To automatically make the browser trust all certificates signed by your TinyCert CA, add its certificate to the browser certificate store as described below.
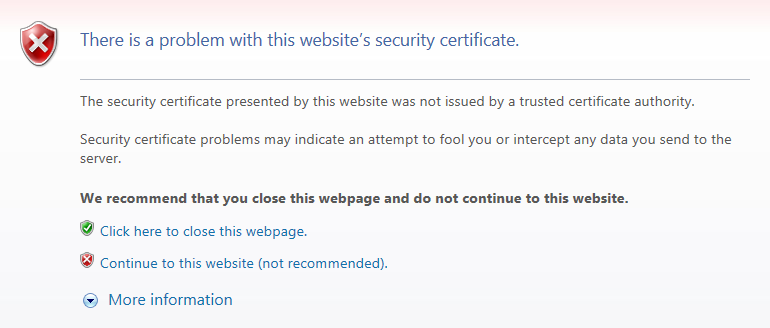
When visiting a site secured with a TinyCert or self-signed certificate, Internet Explorer will display a warning message. You may simply click the action link "Continue to this website (not recommended).". You will need to do this every time you visit the site in question, unless you add your TinyCert CA certificate to the operating system certificate store as described below.
When you have downloaded your CA certificate from the panel on the TinyCert dashboard, you have two options:
Once you have done this, all software that uses the operating system certificate store (including Internet Explorer and Google Chrome) will trust certificates signed by that CA root certificate.
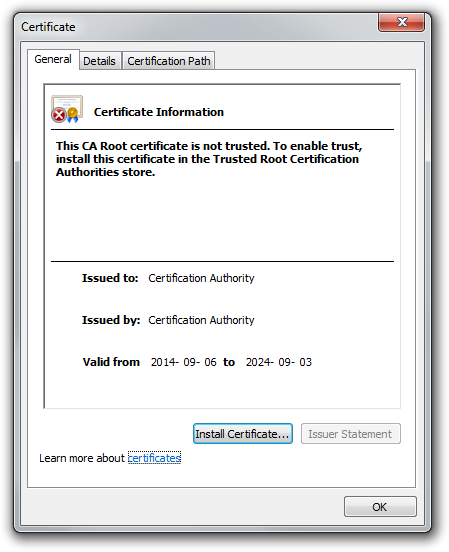
Rename the downloaded file from cacert.pem to cacert.crt. Then, double-clicking the file in Windows Explorer will bring up a property sheet where you can click the button "Install Certificate..." to start the import procedure.
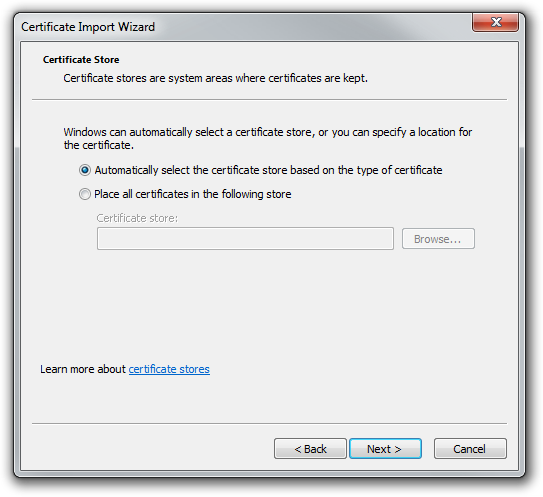
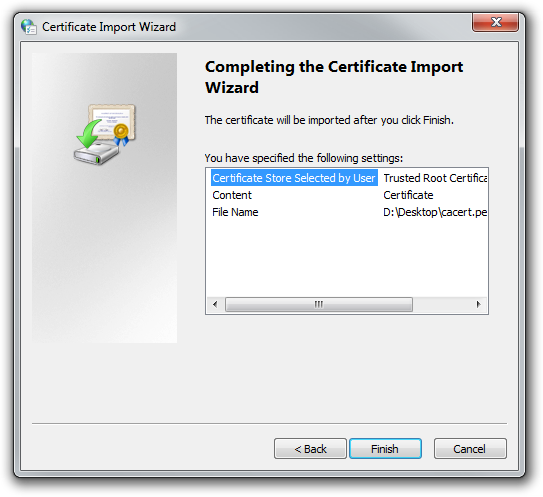
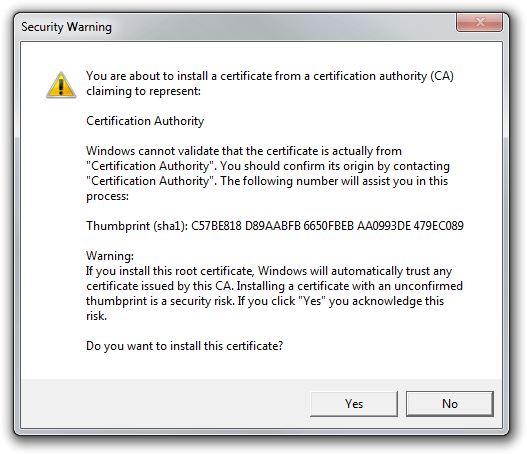
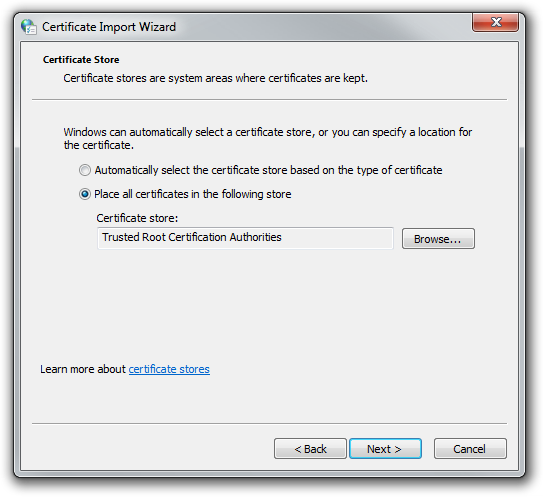
The Certificate Import Wizard starts. On the next screen the wizard gives you the opportunity to choose the certificate store in which to import. Leave this at the default (Automatic selection) or manually select the "Trusted Root Certification Authorities" store. On the final wizard page, the "Finish" button will pop up one last warning message. Acknowledge the warning and click "Yes" to actually install your CA certificate into the operating system.
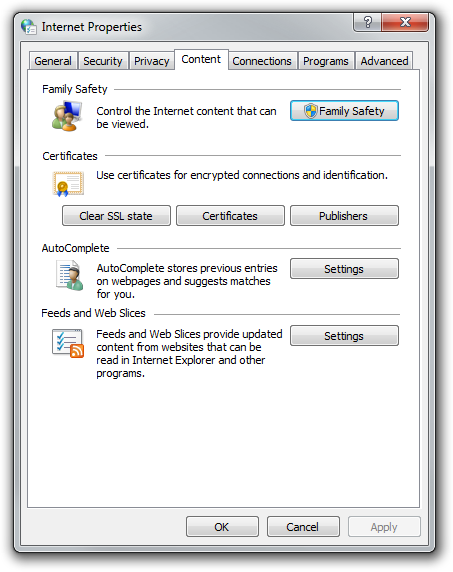
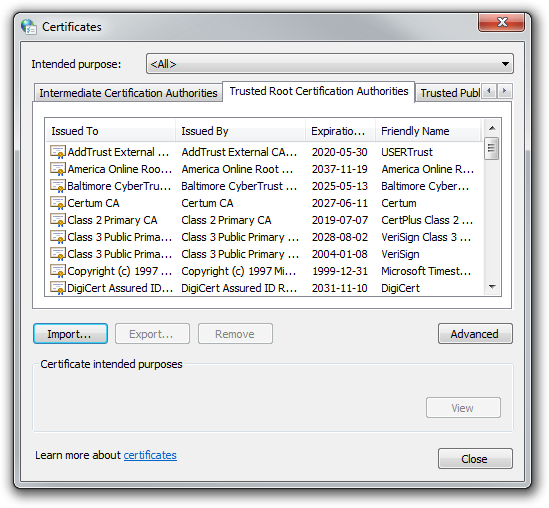
Go into "Internet Options" control panel applet and switch to the "Content" tab. There, press the "Certificates" button to open the "Certificates panel", where you should select the "Trusted Root Certification Authorities" tab. Start the import procedure by clicking the "Import..." button.
The Certificate Import Wizard starts. Continue on to the next screen and select the cacert.pem file. Note that Windows expects X.509 certificates to have the extension .cer or .crt so it will not show up in the open file dialog unless you select "All files (*.*)" as a file type. The wizard then gives you the opportunity to choose the certificate store in which to import. Ensure that this is indeed the "Trusted Root Certification Authorities" store. On the final wizard page, the "Finish" button will pop up one last warning message. Acknowledge the warning and click "Yes" to actually install your CA certificate into the operating system.
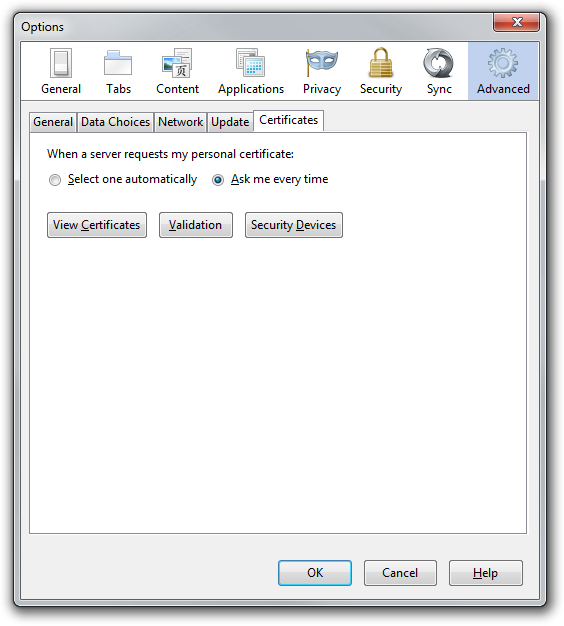
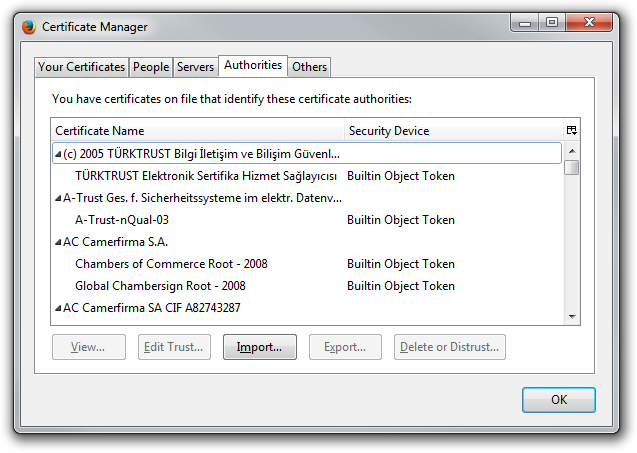
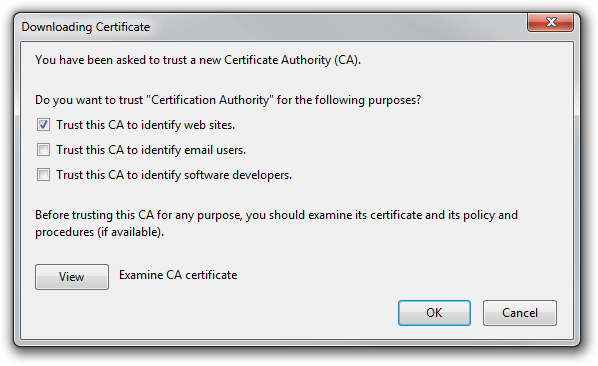
In the Firefox options window, go to the "Advanced" panel and switch to the "Certificates" tab. From there, click "View Certificates" to open the Certificates Manager. On the "Authorities" tab, click "Import..." and select the downloaded cacert.pem file. Firefox then asks you for what purpose the certificate should be trusted. Make sure at least the checkbox "Trust this CA to identify web sites" is enabled before clicking OK.
Once you have done this, Firefox will trust certificates signed by that CA root certificate.
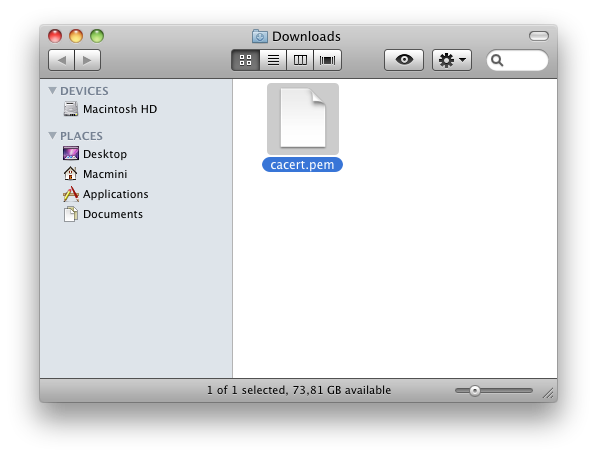
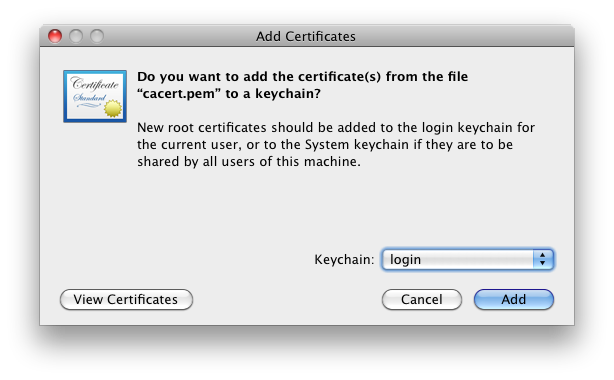
Download the CA certificate from the panel on the TinyCert dashboard. Your browser may offer to open the file in Keychain Access, or you can simply doubleclick the downloaded cacert.pem file.
Mac OS may ask you which keychain to add the certificate to. Like the popup window says, use the "login" keychain if it is for your own account, or the "System" keychain if it is for all users of the machine. If you are the only user on it, there's no appreciable difference.
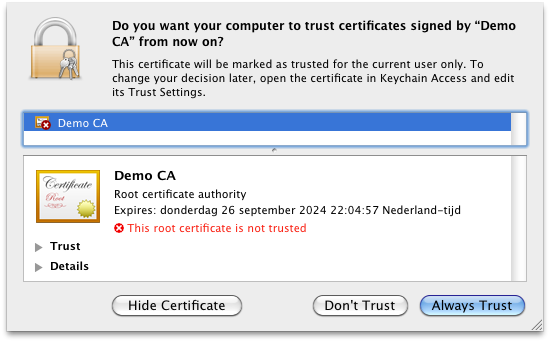
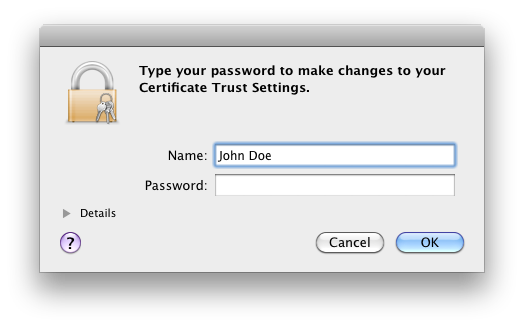
Be sure to verify that the certificate is the one you created, then click the "Always Trust" button. After you enter your password, all certificates signed by that CA root certificate will be accepted by the system.